Tuesday, November 24, 2009

NO PEEL APPLE CAKE

This recipe even a total novice can do.  
Its basically chopping up apples, nuts, soaking raisins and cranberries.
If you are watching calories, use 1 cup oil and 1/2 cup apple sauce. Change sugar to 1 1/2 cups.  Its still good.

INGREDIENTS
          Bowl #1   
Mix together with hand mixer
1 1/2 cups  cooking oil
2 cups sugar
3 eggs

2 t. vanilla or rum


         Dry Bowl #2   Mix and add to Bowl #1
2 cups flour
1/2 t. salt
1 t. baking soda
2 t. cinnamon


        Dry bowl #3     Fold into Bowl #2
1 cup chopped nuts (walnuts or pecans are good.)
3/4 cup oatmeal (optional)
1 cup plumped raisins and/or dried cranberries
4 or 5 golden delicious apples chopped small, not peeled
Note:  If you used other apples, you might want to peel them.


These measurements are pretty loose.  You can do less or more on the apples, etc... cut the oil a little, cut the sugar a little.  It will still be great.

Bake at 325 degrees.
Season pans with an oil spray.  I used a new outrageously expensive mold pan from William Sonoma this time.  Other times I use foil loaf pans, bundt pans, sheet pans. 
Timing varies then.  Loaf pan take about 60 minutes.  You just keep checking it until it appears to be browning and pulling just ever so much away from the side. It will rise quite a good bit and be rounded on the top.  Let it cool and rest 15 MIn. If you need to remove it, do it then. 


Slice it and heat it for breakfast with a little butter.  Die happy.

Photo is of the ones I baked in the mold pan.  i may put a frosting or glaze on them for gifts. These cakes freeze very well too.  

BROWNED SUGAR COOKIES FROM HEAVEN

Now these are not quick cookies.


       INGREDIENTS
12 tablespoons unsalted butter divided into 8T. and 4T.
1/4 cup granulated sugar (about 1 3/4 ounces)
       (For rolling only.  I used raw sugar and brown sugar.)
2 cups packed dark brown sugar (14 ounces)
2 cups unbleached all-purpose flour plus 2 tablespoons (about 10 1/2 ounces)
1/2 teaspoon baking soda
1/4 teaspoon baking powder
1/2 teaspoon table salt
1 large egg
1 large egg yolk
2 teaspoons vanilla extract
(Cook's  had 1 T. which I thought was way too much. Maybe a typo.)
Preparation:
       #1. STOVETOP SAUCEPAN
Heat 8 tablespoons of the butter in a pan over medium-high heat until melted. 
Continue to cook the butter until it is browned a dark golden color and smells nutty, about 1 to 3 minutes. ( Or 6 min.)
       #2. LARGE BOWL (will mix dry also in here in step 5.)
Transfer the browned butter to a bowl and stir the rest of the butter (4 T.) into the hot butter until it melts- let this rest for 15 min.
Preheat oven to 350 degrees F. 
       #3.  COATING MIXTURE DISH 
In a baking dish, mix granulated sugar and a ¼ cup of the brown sugar until combined well; set this mixture aside to roll dough balls in.
       #4.  DRY INGREDIENTS BOWL 
Mix flour, baking soda, and baking powder in a bowl. 
       #5. LARGE BOWL   FROM STEP #2
Add 1 ¾ cup brown sugar and salt to cooled butter and mix until there are no lumps. 
           5a. When butter is room temperature again.  add egg, yolk, and vanilla to butter mixture and mix well, then add flour and mix until just combined.  Refrigerate for 15 minutes.
      #6.  Roll dough into balls about 1 ½ inches in diameter, and roll balls in brown sugar and white sugar mixture. 
Place balls about 2 inches apart on parchment lined baking sheets.  They really enlarge
Bake sheets one at a time until cookies are puffy and lightly browned, about 12- 14 minutes. 
(Be careful not to over bake.) 
Cool on sheet for about 5 minutes and then transfer to a rack to cool.  
        Recipe from Cook’s Illustrated with my changes.  I cut 2 T. from the butter.

Saturday, November 21, 2009

FOOD IS IN THE BLOOD

Sicilians feel that food and how to prepare it, is a gift from God and some may not have this gift, but WE DO. Its a given.  I have never heard of a bad Sicilian cook. Just doesn't happen as far as I know.
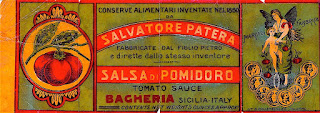
In my family, expertise in cooking goes back to my great grandfather Salvatore Patera who was a chef for wealthy people in Bagheria, I believe.  If I am wrong on that, who is going to care anyway. Okay, I digress.

This is the label that the family saved from Grandpa Patera's family.  The label, I suspect, is from the late 1800s.  Did some research and found out the Patera family is listed in a history of Bagheria, Sicily.  Salvatore Patera was in partnership with a Guiseppe Verdone.  It ended and the above label was kept by Verdone when he took over.   The new company is still in existence.

Friday, November 20, 2009

MEAT THERMOMETERS

They are not to be trusted.  I used one on my turkey.  Why?  
Well, I had never used one before and I owned one, I thought its time to see if this would help make sure I did not overcook the bird.  
It said the breast meat was 180 degrees which is 20 over what is considered done.
Its wasn't raw but it could have taken another 30 minutes. The joints were not free yet and the browning was not really there.  I was afraid I had overcooked it but that was not the case.


You win some, you lose some.


Taste was fine.  But it wasn't the best turkey I ever roasted.
Back to my old tried and true methods. The legs must be almost free and ready to come off the bird.

Sunday, November 15, 2009

TURKEY ROASTING TIPS (NOT STUFFED)

1.   WATER OR WINE.  Use white wine in place of water (broth) in the bottom of the pan to keep moisture in the turkey while roasting.  Or combine them.
2.  RACK?  No rack?  Use celery stalks, onions, carrots and layer the bottom of the pan and place your turkey on top.  It holds it up and flavors the drippings.
3.  Use medallions of seasoned butter under the skin or oil your hands and lift the skins over the breast and run the oil directly on the meat.  You may also season the oil before you do this.  Canola is  recommended.
4.  TENT and seal the turkey for the first hour at least.  I like up to 2 hours before I finally open up the bird. This will allow the steam to cook the meat without drying it out.
5.  HIGH HEAT to start?  450 degrees? Then revert to 325 degrees.  Well, do what you want, if you have prepared the turkey, it will be fine.
6.  POSITION IN THE OVEN.  Place on lowest rack.  The bird does best with a 6" clearance from the top of the oven.  I use an insulated cookie sheet under the roasting pan.  This insures an even heating of the bottom of the pan.  You are probably just fine without it.
7. WHEN TO UNCOVER? If you have tented the bird, you need to remove the cover for at least 40 minutes to over an hour at low heat of course.  Basting starts now.  Remember it does not keep moisture in but makes the skin more chewy.  
8.  IS IT DONE? Turkeys are done around 160 degrees in the deep part of the breast.  Alton Brown says there is carry over on the roasting so take it out of the oven to rest when the meat thermometer hits 151 degrees.  ITS STILL COOKING.  
My tried and true is if the leg is about to come off when you pull on it.  This means the joints have cooked enough that they are done and the meat is done too.
This reminded me of fish. If the platter is hot, the fish is still cooking on the platter after broiling or frying.
8.  Apples and apple cider can flavor your bird and the stuffing.
9.  See my other posts on turkey roasting.

Saturday, November 14, 2009

POULTRY SEASONING. WHAT THE HECK IS IN THERE ANYWAY?

Isn't this a question that crosses your mind about once every 20 years.  What is in that little bottle?  Can I make my own?  Yes, of course, you can.
My net search results are here. These are the general spices used. 
           Ingredients
2 Teaspoons         Ground Sage   (I use more)      
1 1/2 Teaspoons   Ground Thyme                 
1 Teaspoon           Ground Marjoram
3/4 Teaspoon        Ground Rosemary                        
1/2 Teaspoon        Nutmeg                    
1/2 Teaspoon        Ground  Black pepper 
I am getting ready to make my flavored butter to put in the turkey under the skin. 
I make it early and keep it frozen until I need it.  
Basically you soften the stick of butter a lot. Don't melt it though. 
Then mix in a couple of tablespoons of the herbs above into the butter. Mix well, place it in a ziploc bag. Push the butter down to the bottom of the bag and then zip it. 
Fold the top over the bottom. Place in the freezer.
When you need to use it, place on counter for an hour.  Open bag.  
Reveal the log of butter that should be still hard.  Cut into about 6 medallions.
Now you are ready to insert them beneath the skin of the turkey.
Not that difficult really. Just move your fingers under the skin starting at the breast bone and it separates pretty easily.


TURKEY ROASTING Technique for a moist bird

This was the hit of Thanksgiving. I have roasted maybe 45 or 50 turkeys in my life but this one was the best.  Well, I started at 16.
Salt brine the bird and clean it up as you usually do.  RINSE WELL. There is a lot written on the brine being really important.  My family always did it so it wasn't news to me. 
WARNING ON SALT.  I found poor rinsing can cause your gravy to be too salty

Brine note 1: You will need at least 10 to 12 hours according to most chefs., a container large enough to hold your turkey and enough brine to cover it. You'll also need salt, water, seasonings, and enough room to refrigerate it. Both Reynolds (Oven Roasting Bag for Turkeys) and Ziploc (XL Storage Bag) are big enough for brining.  I have placed a turkey in the sink inside a clean plastic bag with salt etc...and filled the sink outside the bag with ice.  It worked for me. I brine my turkey about 4 hours usually.  Its fine.
Brine note 2:  Alton Brown puts in brown sugar and salt for the brine.
Stuffing note:  I have not included stuffing or actual temperatures since the instructions found on the turkey will do just fine. "Joy of Cooking" also had traditional recipes that are very good.
You may use whatever spices you want on the bird.

                  INGREDIENTS:
      2 T poultry seasoning or your own mix.  
          If you think it needs more, go for it. 
          ( I like to use fresh sage, rosemary, thyme, garlic.)
      1 cube of butter
      1 cube of butter for basting
      crushed garlic or garlic salt (optional)
      1 cup of water  or more
       apple, onion, celery, carrot  (optional)

1 zip lock bag for the butter medallions
Aluminum foil for tenting
               PREPARE FOR ROASTING THE TURKEY
Remove from the brine and rinse it off.  It should be ready for adding the above.
               BASTING THE TURKEY
Prepare the following spiced butter the night before roasting.
Soften the cube of butter and mix in the seasoning. Place this spiced butter in a ziploc bag.
ROLL THE BUTTER DOWN TO THE BOTTOM of the bag and then flip the empty part over it to form a roll.  Refrigerate over night. You might even freeze it for 20 minutes.  It must cut easily. Spiced butter must be hard.
Remove the bag.  Slice medallions of butter about 1/4 inch thick. They need to remain firm. 
LOOSEN THE SKIN on the bird over the breast with your hand. Just keep wiggling your fingers under the skin and it comes loose. Slip in at least 3 medallions under the skin and arrange so they will bast the breast. Do the same for the other breast, neck and legs if you can. This keeps the meat moist during the roasting.

PHOTO is of bird almost ready for oven.  The foil is to protect my nonstick pan from the roasting rack.  
Notice the butter/herb medallions.  I also placed whole fresh sage leaves under the skin. Which was not my best idea because if you are into showing off the browned bird, the leaves of sage still come through.  I didn't like the look very much. 

I added fresh whole sage and thyme to the bottom of the pan. That was a GOOD idea. You win some, you lose some.  I had not yet added the warm butter over the skin.  I sprinkled some poultry seasoning on the bird too.  I do that just before tenting it and sealing it as carefully as I can.  
Then a cup or more of water (wine?) in the pan. This will steam the turkey. VERY IMPORTANT.
DO NOT OVERDO THE WATER (WINE?) ADDED. 
 It keeps the juices from browning and that adds flavor to the gravy of course.

               FILLING THE  CAVITY
Add some of the butter medallions to the cavity.
I  put in a cut up onion, celery,  apple, and carrots along with my choice of poultry spices (sage). Tie the legs if you want. Baste the outside of the skin with butter and a little garlic if you like. 
              PREP FOR THE OVEN
Preheat your oven following your instructions that came with the bird or use "Joy of Cooking."
Place the bird on a roasting rack inside the roasting pan. Tent loosely and then seal the turkey with the foil. Try and not touch much of the breast with foil if you can.  
During the roasting, keep it sealed for 2 hours or more. Check it and baste it of course.  It will not need much. If the water DISAPPEARS, add a small amount of water to the pan. The steam does the trick.
              BROWNING
When your bird is ready to uncover and brown, baste it as usual for about 45 minutes. Basting doesn't moisten the meat but it makes the skin chewy. That is what the experts say anyway. Time in the oven depends on the size of your bird.  I usually roast a 12 to 15 pound bird. I did not include temperatures. Just follow what you always do. It will be fantastic. After the bird is done, remove from oven and let it sit for 30 minutes to have the juices set in the meat.   It will be the best turkey you ever roasted.
            CARVING THE BIRD
I watched Tyler carve out the entire breast in one piece and then cross slice it like a pork roast.  It looks good.  I am going to do it that way this Thanksgiving.
NOTE:  The Barefoot Contessa had a show today using olive oil instead of butter under the skin then white wine instead of water.  I am going to change to wine on my next turkey and see if I can tell a difference.

THE ART OF OVEREATING

A high school friend from a life time ago has written a book which is humorous on food and eating habits.  The Art of Overeating. Go Leslie. And good luck with your book.
Back in the days before diets became “lifestyle” choices and weight loss programs became a national obsession, eating was just one activity that we all had to do that was even – gasp – fun.
Leslie Landis has been a practicing clinical psychologist since 1999. In that capacity she has helped individuals who eat, spend, avoid, deny, and defy, and has gained many insights about overeating through their experiences. She lives in Southern California with her husband, Martin.


Title: The Art of Overeating by Leslie Landis  
ISBN-13: 978-1402764561
Publisher: Sterling (November 2009)
US $9.95/Can. $12.95

Amazon sells it at a lower price of course.

The Art of Overeating at Amazon.com

Monday, November 9, 2009

CLARA'S KITCHEN by Clara Cannucciari

  May I introduce you to Clara Cannucciari.  at the age of 94 she is on Youtube, appeared on morning TV and has written a book of memories and recipes.  Lots of memories.
She lived through the depression and grew strong and frugal with the help of her family.  They were a united front to get by and feed their family when they was little or no work. Here is a brief paragraph from her book.

"We made a lot of meals with eggs because they weren't just cheap, they were practically free.  Back in those days, we all had our own chickens, which we kept in the yard.  It was pretty normal to have a few chickens running around the yard back then, but they probably wouldn't allow that anymore. So we always had our own eggs.  And then sometimes for Sunday dinner, we'd kill a chicken.  But that was rare. We needed the eggs!"
           See her videos at:        
http://www.youtube.com/user/DepressionCooking 
          Buy the book at:    Clara's Kitchen